Of course! Chocolate Mousse Domes are a stunning, professional-looking dessert that combines a rich, airy mousse with a glossy, mirror-like glaze. They are perfect for a special occasion or when you want to truly impress your guests.
This recipe breaks down the process into manageable components, all of which can be made ahead of time.
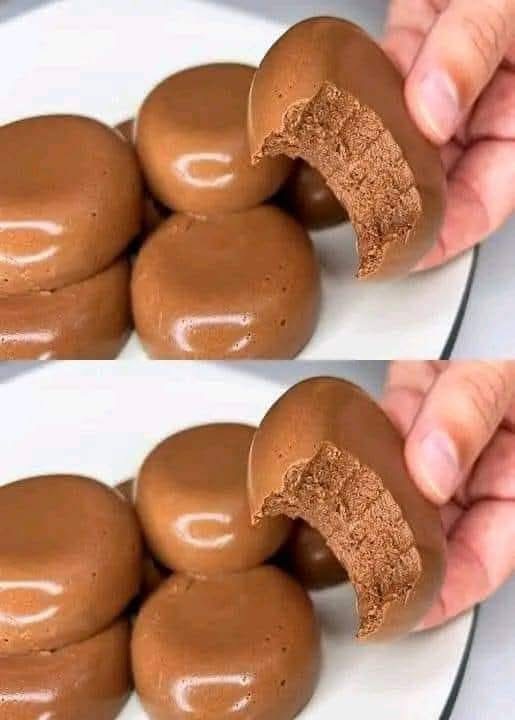
Chocolate Mousse Domes
This recipe features a chocolate cake base, a dark chocolate mousse, and a shiny chocolate mirror glaze.
Yields: 6-8 domes
Prep time: 1.5 hours (plus significant chilling/freezing time)
Cook time: 20 minutes
Components & Ingredients
You will need:
· Semi-sphere silicone mold (each cavity about ½-cup capacity)
- For the Chocolate Cake Base (or a simpler alternative):
· 1 large egg
· 2 tbsp (25g) granulated sugar
· 2 tbsp (30ml) flavorless oil (like canola or vegetable)
· 2 tbsp (30ml) whole milk
· ½ tsp vanilla extract
· ¼ cup (30g) all-purpose flour
· 2 tbsp (10g) unsweetened cocoa powder
· ¼ tsp baking powder
· Pinch of salt
Shortcut: Use a store-bought chocolate brownie or a dense chocolate cupcake as the base.
- For the Dark Chocolate Mousse:
· 4 oz (115g) high-quality dark chocolate (60-70%), finely chopped
· 1 cup (240ml) heavy cream, divided
· 1 tbsp (15ml) honey or light corn syrup (for stability and shine)
· 1 tsp vanilla extract
· Optional: 1 tbsp (15ml) liqueur like Grand Marnier, Kahlúa, or rum
- For the Chocolate Mirror Glaze:
· ¾ cup (150g) granulated sugar
· ½ cup (120ml) water
· ½ cup (50g) unsweetened cocoa powder, sifted
· 2 tsp powdered gelatin (or 2 sheets leaf gelatin)
· 3 tbsp (45ml) cold water (for gelatin)
· ½ cup (120ml) heavy cream
· 4 oz (115g) high-quality dark chocolate, finely chopped
For Garnish:
· Edible gold flakes, gold dust, fresh berries, or chocolate curls.
Instructions
Part 1: The Chocolate Cake Base
- Preheat oven to 350°F (175°C). Line a small baking sheet or 6×9 inch pan with parchment paper.
- Whisk egg and sugar until pale. Add oil, milk, and vanilla.
- Sift in flour, cocoa, baking powder, and salt. Mix until just combined.
- Spread into a thin layer on the prepared pan. Bake for 8-10 minutes until the top springs back. Let cool completely.
- Use a small round cutter (slightly smaller than the diameter of your dome molds) to cut out circles. Place one circle at the bottom of each mold cavity.
Shortcut Method: Press a small piece of dense brownie or a trimmed cupcake bottom into each mold.
Part 2: The Dark Chocolate Mousse
- Bloom Gelatin (if using for mousse): Sprinkle the gelatin over the 3 tbsp of cold water in a small ramekin. Let it sit for 5 minutes to bloom.
- Make the Ganache Base: Place the chopped chocolate in a heatproof bowl. Heat ½ cup of the heavy cream with the honey in a saucepan until it just begins to simmer. Pour over the chocolate and let it sit for 2 minutes. Add the bloomed gelatin (if using) and vanilla. Whisk until smooth and glossy. If using gelatin, ensure the mixture is warm enough to dissolve it completely. Let it cool to room temperature, but not set.
- Whip the Cream: In a separate bowl, whip the remaining ½ cup of heavy cream to soft peaks.
- Combine: Gently fold one-third of the whipped cream into the cooled chocolate ganache to lighten it. Then, carefully fold in the remaining whipped cream until no white streaks remain.
- Assemble the Domes: Pipe or spoon the mousse into the molds, over the cake base. Fill to the top and smooth the surface.
- Freeze: Tap the mold gently on the counter to remove air bubbles. Freeze for at least 4 hours, or preferably overnight, until completely solid.
Part 3: The Chocolate Mirror Glaze
- Bloom Gelatin: Sprinkle the gelatin over the 3 tbsp of cold water in a small ramekin. Let it sit for 5 minutes.
- Make the Glaze Base: In a saucepan, whisk together the sugar, ½ cup water, and sifted cocoa powder. Bring to a boil over medium heat, whisking constantly, and let it boil for 1 minute.
- Melt Gelatin: Remove the saucepan from the heat. Whisk in the bloomed gelatin until it’s completely dissolved.
- Melt Chocolate: Place the 4 oz of chopped chocolate in a bowl. Pour the hot cocoa mixture over it. Let it sit for 2 minutes, then whisk until smooth.
- Add Cream: Stir in the ½ cup of heavy cream until fully incorporated.
- Strain and Cool: Strain the glaze through a fine-mesh sieve to remove any lumps. Let it cool to 85-95°F (29-35°C). This is the ideal temperature for glazing. Use a thermometer for best results.
Part 4: The Grand Finale – Glazing and Serving
- Prepare: Place a wire rack over a baking sheet (to catch excess glaze). Take the frozen mousse domes out of the freezer. Unmold them onto the wire rack.
- Glaze: Pour the cooled glaze over one dome at a time, ensuring it flows evenly and covers the entire surface. You can pour from a measuring cup or ladle. Work quickly before the domes start to thaw.
- Decorate: Immediately after glazing, while the glaze is still wet, add your garnishes like gold flakes or a single berry.
- Defrost and Serve: Carefully transfer the glazed domes to a serving plate using a spatula. Place them in the refrigerator to thaw slowly for at least 3-4 hours before serving. The texture should be cool, soft, and mousse-like.
Pro-Tips for Success
· Temperature is Everything: The mousse must be FROZEN solid, and the glaze must be between 85-95°F (29-35°C). If the glaze is too hot, it will melt the mousse. If it’s too cold, it will be too thick and won’t flow smoothly.
· Strain the Glaze: This is non-negotiable for a perfectly smooth, mirror-like finish.
· Make-Ahead Magic: You can freeze the unglazed domes for up to a week. The glaze can be made 2-3 days ahead and stored in the fridge; gently reheat and bring to the correct temperature before using.
· Troubleshooting: If your glaze is too thick, add a teaspoon of warm water. If it’s too thin, let it cool a bit more.
Enjoy creating these breathtaking and delicious chocolate masterpieces